In this ThriveCart review, you’re going to learn how you can use this shopping cart platform to create a high-converting checkout process so you can sell your products and services.
You’re also going to learn how you can use
So with
As a shopping cart platform,
And you will see how
To achieve that, you can use upsells, downsells, and bump offers to increase your average order value and maximize profitability.
In this
As well as we’re going to discuss their customer support and pricing.
But before we do that, let’s first explain what ThriCart actually is.
[lasso rel=”thrivecart-link” id=”2637″ ref=”thrivecart-link” link_id=”703″]
What Is ThriveCart Really?
ThriveCart is a shopping cart platform and affiliate software that helps online businesses take payments for products or services, as well as recruit affiliates to promote their offers.
It’s similar to Samcart and
You can find a full review video below of the checkout process:
ThriveCart ’s Features
So in this
And how you can use them to drive more digital sales for your online business.
No matter if you’re selling digital products, physical products, or any other type of products online.
Let’s look at some of
1-Click Bump offers – this is when someone gets to your cart and there is a checkbox that you can have that will add something to the cart.
By using 1-Click bump offers you can very easily drive more digital sales, increase your average order value, and get the customer to spend a bit more money with you.
Especially, since the 1-click bump offers feature stands out in the shopping cart itself and it grabs the attention.
1-Click upsells – so with this one feature people can buy your upsell offer with just one click without the need to fill in credit card details again.
Unfortunately, This
It’s only available with Stripe. It won’t work with PayPal as it is very complicated to get it enabled within your account.
Embedded cart – you can embed the cart on your website so you can have all of your checkout pages on your own domain.
Normally, it will still say “powered by
Even though you might prefer to have your checkout pages on the
Funnel builder – you can use
So if someone makes a purchase you can send them to another page where you can make an additional offer.
And if they reject that, you can send them to a downsell offer.
So this is very handy if you want to increase your average order value and the profitability of your campaigns.
But keep in mind that this is not a funnel builder like ClickFunnels or Kartra where you can have landing pages, etc.
A/B testing – you can use this feature to A/B split test different elements of your shopping cart.
So you can make 2 versions of your shopping cart pages and test things like:
- Headlines
- Images
- Videos
- Outline
- Background and button colors
… and so on.
You can also test different prices of your products, payment plans, upsells, downsells, etc.
The options are limitless!
And the A/B testing features can definitely help you find out what converts better and drives more digital sales.
And it will help you improve your cart pages.
Affiliate center – you can use this to add affiliates to your shopping carts so they can promote your products for you.
And it’s nice that this is part of the same shopping cart platform.
So you don’t need to pay for extra software and integrate it so you can have affiliates promoting your products.
And
So you can pay your affiliates automatically via PayPal after a sale has been made.
Auto-followup – with this you have shopping cart abandonment features. So when someone abandons your cart,
They can apply a specific tag to that user that says “abandoned cart” and then in your email marketing platform, you can have automation being triggered with that tag.
That way you can send them an email an hour later and remind them to come back and finish their order.
It’s a very powerful feature that can help you sell more of your digital and physical products.
Autoresponder integrations – Unfortunately,
So you need to make sure you’re using an autoresponder that integrates with
You can check the full list of autoresponder integrations in the
Coupons – you can create coupons and discount codes that you can give to your customers to motivate them to buy from you.
They’re extremely easy to create and you have complete freedom to decide on everything.
How much of a discount to offer, for how long the discount is going to be available, etc.
And also
They even have a discounted URL that you can send to your customers straight away.
So it’s a really nice feature that they offer.
2-step cart –
So you can collect contact information on step 1 and payment information on step 2.
That way if people didn’t finish their order, you can follow up with them by email, bring them back and convert them.
So in this
They have put a lot of effort into creating an optimized checkout process. And into offering features that will help their customer make a lot more money.
ThriveCart Integrations
In this
So you know if you can connect this shopping cart platform with the other tools that you’re currently using.
Now, let’s take a look at the different integrations that they offer:
Payment gateways – it supports Authorize net, PayPal, and Stripe.
Autoresponders – ActiveCampaign, AWeber, ConvertKit, Drip, GetResponse, HubSpot, InfusionSoft, MailChimp, Lite, Ontraport
Membership platforms – Digital Access Pass, Membermouse, Memberpress, Optimizemember, Teachable, Wishlist
Webinar platforms – Demio
Fulfillment services – Disk.com, Google Sheets, Kunaki, Lulu, Printful, Shippo, ShipStation, Shopify, Vervante, Zapier.
In this
In my opinion, they can offer a lot more but this is possible to change in the future as they develop the platform.
For example: they only integrate with a few membership platforms. So if you’re using something that’s not in the list, then
The other thing is I believe there are not enough payment processors. Because people might want to use something different than simply PayPal, Stripe, or Authorize net.
ThriveCart Platform Setup
By using
Especially, considering that there are pre-built checkout templates that you can use.
There are some aspects of the interface that look 2013-ish.
But there are some pros and cons to it.
It’s a con if you want something more up to date. But the pro is that this is so easy to use.
Now let’s go to the process of setting up your checkout pages by using
So you see how easy it is to get started with the platform.
Products – the first thing that you need to do is to create a new product.

To do that you just need to click on the blue button “create first product” and you’re ready to go.
Afterward, you need to choose if you’re selling a digital or a physical product.

So let’s say that in our case we choose Digital and we click “Create a new product” to go to the next step.
Then you’re going to go through 4 simple steps to setting up

So in the options tab, you need to write your product name and setup your checkout page URL.
Every product that you create is going to have a dedicated checkout page.

One the next step, you need to setup pricing and payment options.
As a payment type you can choose from:
- One-time fee (the standard way)
- Subscription (when you setup a recurring billing)
- Split pay (you split the price of the product in a few payments)
- Pay your own price (the client pays as much as they want for the product)
You can also setup more than one payment option for your product.
For example: you can have a one-time fee and a split pay as well.
So your customers might have the option to choose between paying a $199 one-time fee and two payments of $120.

One the next step, you can add one-click bump offers if you want to.

With the help of one-click bump offers you can increase your average order value by offering something extra to the customers that are already buying something from you.
As it’s very easy for them to say “yes” to this.
They just need to tick the box and the bump order will be automatically added to the cart.
Not a lot of customization is offered here.
But to be honest, you don’t really need much of your bump offer as it is already pretty well designed.
And it looks really good on the checkout pages later on.

Next, you need to setup your payment processors.
As you don’t really have many options here because as
But the good thing is that you can have more than one on your checkout pages.
So people can choose if they want to make a payment through Stripe with a credit card or with PayPal.

Next, you can tick the box if you want affiliates to be able to promote your product.
If you do then you will be able to setup the affiliate commissions right here. And you can choose among other affiliate options as well.

When you setup the affiliate commissions within
But you can also have different commissions for each pricing option which gives you more flexibility.
The commission type that you choose could be a percentage or a fixed fee on the sale price.
And you can choose the commission percentage for the product, for the recurring billing and for the bump offer as well.
What’s really cool here is you can choose how to pay your affiliates.
You can pay them manually after a specific amount of time. But you can also do that automatically.
Just select after what period of time the commissions to be paid and

In the affiliate options, you can choose if you allow new affiliate sign-ups and if you have to manually approve them.
You can choose if the sales to be assigned to the first or the last cookie.
As well as if the cookie is set for a lifetime or if it expires after a specific period of time.
You also choose if affiliates must connect their PayPal account so they can receive payments.
And if you don’t require that you can pay them by other means.
Fulfillment – the next step is to setup the fulfillment.

So here you can put a support email address where people can contact us in case they have any issue with their order.
And you can also choose what happens after the purchase.
You have 3 options here:
- Display total/invoice after purchase
- Send them to an URL
- Add them to a membership site
And if your customers bought some CD/DVDs you can have the option to send the fulfillment details to Kunaki so they can execute the order for you.
Make sure you check with which membership platforms
Checkout – the next step is to setup the checkout page itself.

The first thing here is simply to choose a template.
There are only 4 available:
- One-step checkout
- Two-step checkout
- Embeddable checkout
- Popup checkout
But to be honest you probably don’t need more than this.

The next step is to customize the template of your checkout.
You will see that the content is already separated in predefined blocks and you can’t really move elements around the page.
And there are definitely some pros and cons to this.
Some people might find this a bit limiting.
But it’s a pretty well-designed checkout template so you don’t really need to check the outline that much.
So if you want a countdown timer, you can click on the top and setup up.
No matter if you want to end at a specific date or be evergreen.
You can also add some guarantee seals on the page to build trust. Even though
Next, you can edit the fields and select what type of information you would like to collect from your customers.
Things like first and last name, email, address, business name, etc.
You can also add custom fields in case there is some additional information that you need from your customer.
A really cool feature is that you can enable a custom checkout so people can tick if they want to receive future marketing emails from you.
Which is great if you want to be GDPR compliant.
You can also edit the buy button and change its text and color.
Even though you can only select among 4 colors – green, blue, red, and orange.
On the top right, you can have a video and an image of the product.
Below that you can add bullet points to reinforce the value of the product that you’re selling.
That way people will have a bigger reason to complete the checkout.
And below that, you can put some testimonials.
You can also select the language of the cart and it’s currently limited to 6 languages:
- English
- German
- French
- Italian
- Spanish
As well as you can change the background color of the cart. Even though there are only 5 colors available for this.
And you can also flip the columns if you want to. Which is pretty much the only customization you can make of the elements in terms of their position.
And that’s all you can do when it comes to creating a cart. Of course, late on you will be able to duplicate this to create more checkout pages.
After this, you can click preview, and it will look something like this:

Next is to setup your success page.

Here you can put a video thanking people for the purchase and explaining to them what to do next to get access to your product.
As well as some text below giving them more information when it comes to their order.
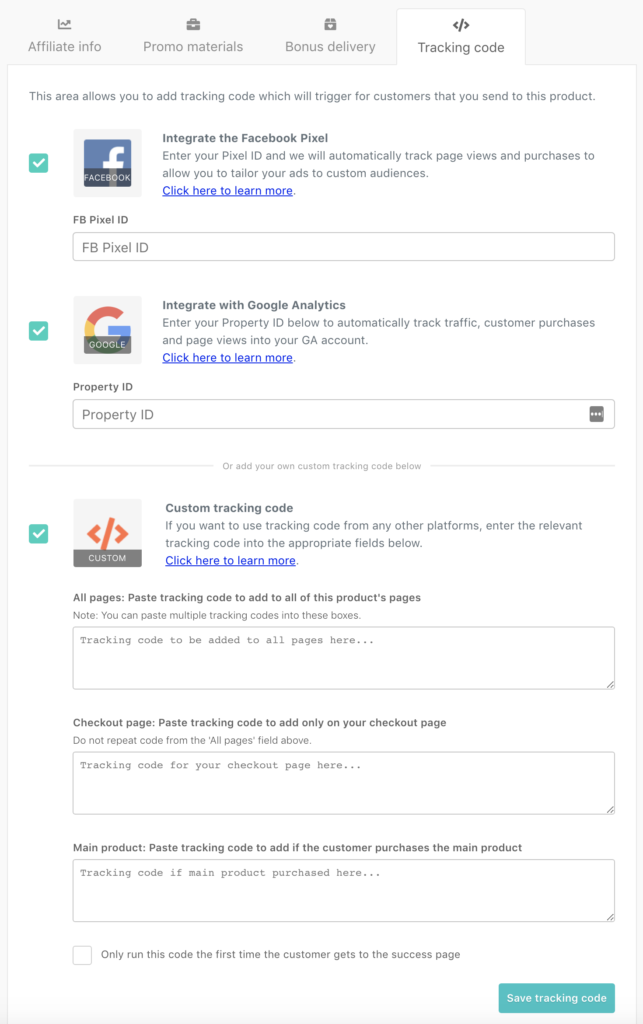
And after this is the last step of the checkout where you setup your tracking codes.

Here you can put your Facebook pixel event for purchase so it could track the order.
And optimize your Facebook ads campaigns.
After you do this, you will move to do the next step – Behavior.
Behavior – this is where you can automate specific actions based on the behavior of your customers.

Behavior would be adding them to an email list, adding some tags, giving them access to your course, or pushing them through a webinar registration.
This is how it is to setup
And you can’t really mess up. You can always go back and edit anything you want.
So in this
They even automatically calculate digital sales tax based on the price of your items.
Creating Upsells And Downsells with ThriveCart

Creating upsells and downsells with
To do that you need to click on Customize your sales funnel.

Next, you need to select enable the sales funnel to be able to customize your post-purchase options.
You can select what happens after people buy your product.
If you want to display their invoice, take them to an URL, add them to a membership site or use a custom script for tracking.
Below that you can setup all of your upsells and downsells.
To create new upsells, you need to go to product -> upsells and click on “Create a new upsell”.

And then the process is very similar to creating a new product.
Downsells work the same way.
A/B Testing With ThriveCart

As well as you can A/B test different versions of the same product.
Let’s say you want to test different pricing or payment options and see what brings you more sales.
All of this you can do with the A/B testing functionality provided by
Creating Coupons With ThriveCart

So here’s how easy it is to setup a coupon in

You put a coupon name that you only use to identify them one from another.
And then you can write whatever you want as a coupon code.
You can choose if you want it to be enabled or disabled.
And then you select a discount type which could be:
- A Fixed-price
- A percentage
- Free shipping
As well as how much of a discount you want to offer (for example: 50% off).
And then you can select if you want this coupon to be used only for the main product, for the main product and the bump offer, or for the entire funnel.
You can also select this coupon to be applied for any recurring or future payments.

On the next step Usage, you select if you want the coupon to be available immediately or from a specific date.
As well as you decide for how long the coupon to be available.
This could be until you decide to disable it or you can set a specific date when it expires.
In
You can also disable the coupon code automatically after it has been used a specific amount of time.

On the next step, you choose if you want this coupon to be used for all of your products.
You can also use it for specific products and simply select which ones from the list.

Then you can setup some targeted behavior rules.
So you can push data to your email autoresponders, apply tags, etc.
The other cool thing is that after you setup your coupon code,
If you copy and paste it in a browser, you will see that the coupon code is already prefilled on your checkout form.
That way you can use this link directly and give it to your customers so you can make it easier for them.
ThriveCart Dashboard
On the
And this will give you an idea when it comes to how well you’re currently doing.

On top, you will see your weekly snapshot that will display your sales day per day.
And this will give you some information when it comes to which day made you the most sales.

Below you’re going to see more stats about your business that will give you the more detailed information.
You will see things like:
- your net revenue
- your gross revenue
- Avg. daily revenue
- Total customers
- New subscriptions
- Conversion rate
- Total transactions
- Orders from affiliates
- Avg. order value
- Commissions
- Annual revenue
- MMR
… and so on.
Actually you can customize your dashboard and you can add more stats to it.
As well as you can remove some if you believe are not important to be tracked.
ThriveCart Transactions
This is extremely helpful so you understand what you’re selling and whom you’re selling it to.
Here you can see your overall stats and break them down based on all sorts of criteria – like date, transaction types, etc.
You can also search customer names, email addresses, etc. and find their profiles.
So you can dig into each of your customers and figure out their lifetime value.
ThriveCart Subscriptions
Here you can see stats about all of your subscriptions and recurring billing payments.

You can select the date range that you want to check out data for.
And then you will see the full list of recurring customers.
You will also be able to see the average yearly revenue from them and their monthly recurring revenue (MRR).
These stats are extremely valuable when making revenue predictions in your online business so you know what income to expect next month.
ThriveCart Affiliates
And you can sign up affiliates to promote your products in exchange for a commission.
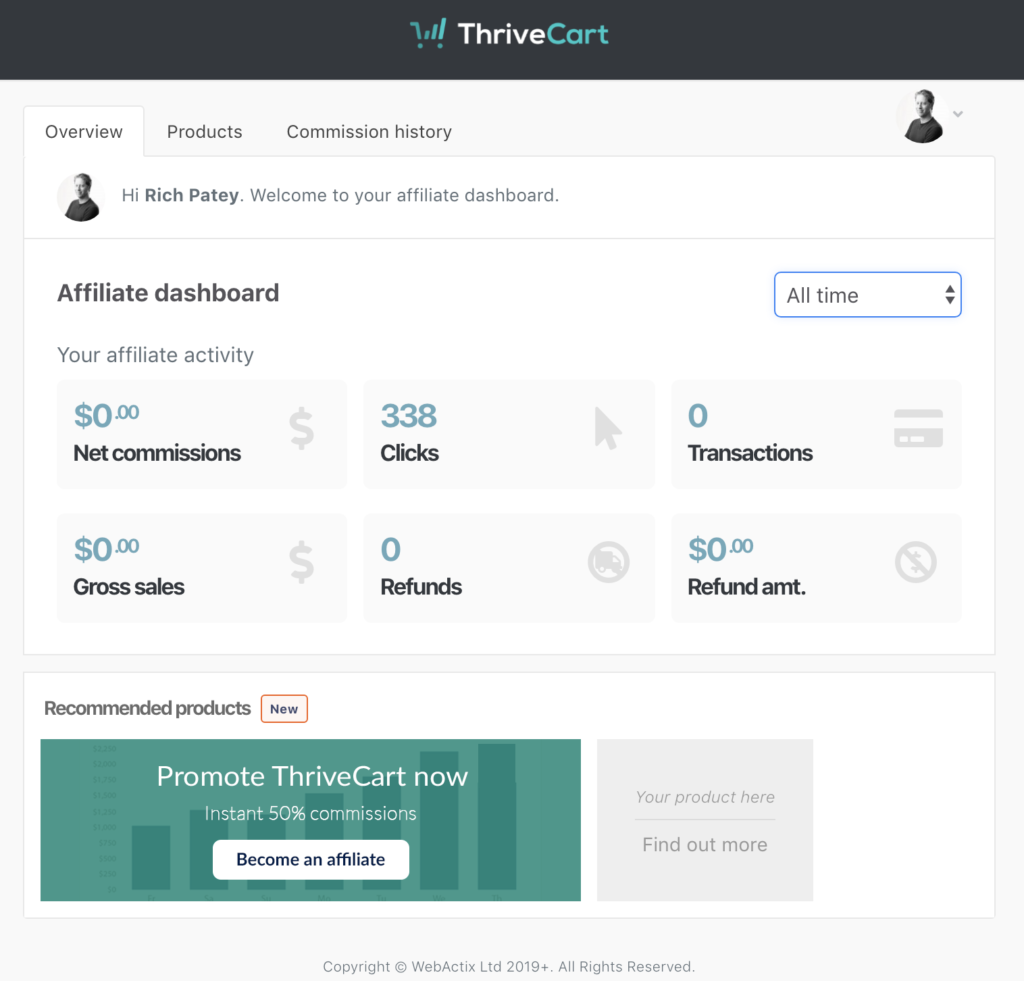
This is what the affiliate dashboard looks like:

In the overview tab, you’re going to see stats for:
- Total commissions earned
- Total paid commissions
- Number of active affiliates
- Number of affiliate sales
This will give you an idea when it comes to how well your affiliate marketing efforts are paying off right now.
And if you need to change something to generate more sales.
Here
As well as which products they sold.
Affiliates get their own dashboard and when they log in are greeted with the overview tab showing all activity broken down by date.
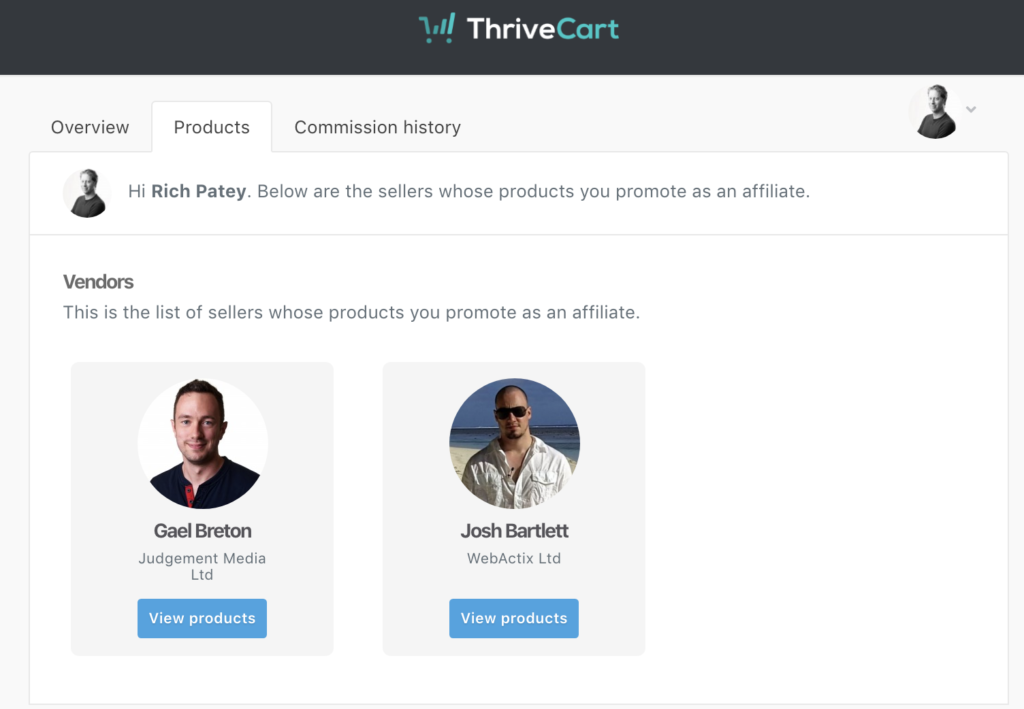
When you click on the Products tab, affiliates can see a list of all vendors they have signed up with.
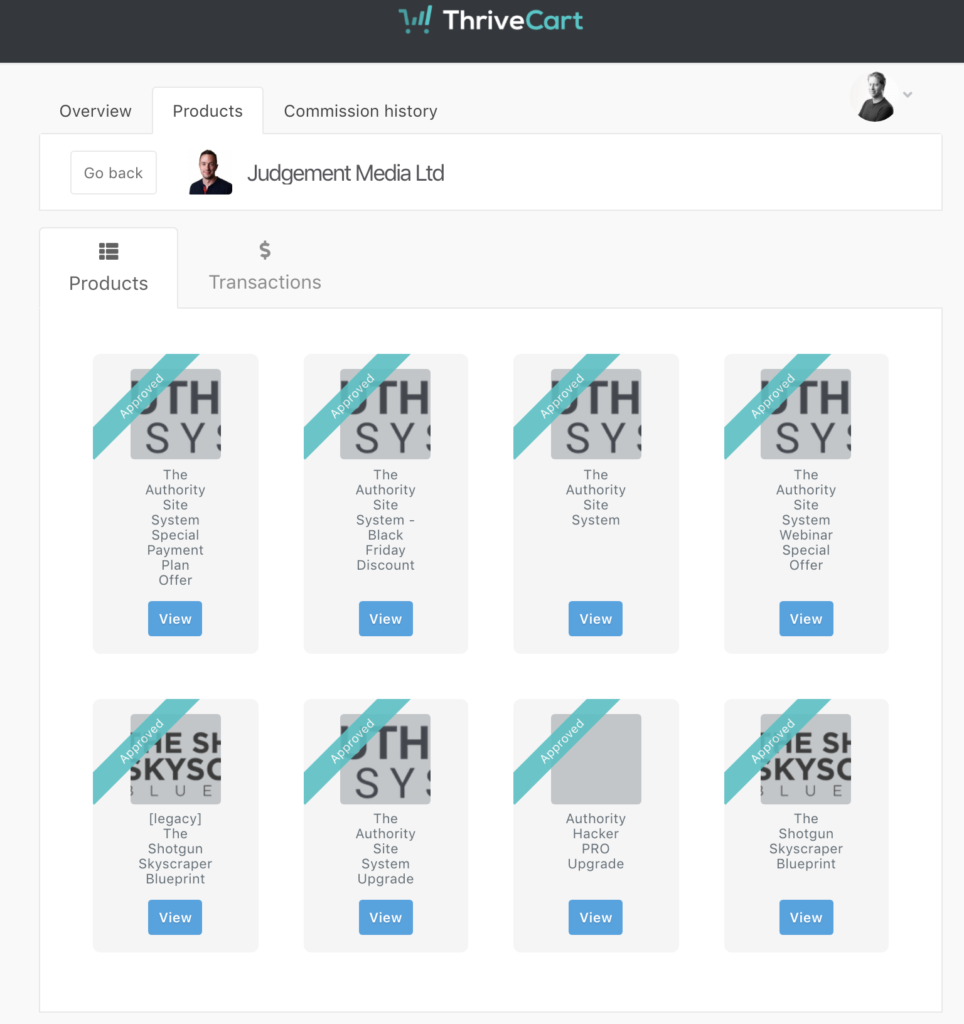
If we click on the one by Judgement Media in the above example, you can see a full list of products that the company has authorized an affiliate to promote and will pay for commissions for.
If we click on one, you can see that companies can offer their affiliates a range of affiliate links to promote the product – in this case, you can promote the sales page, webinar page, blog post, or even podcast episode.
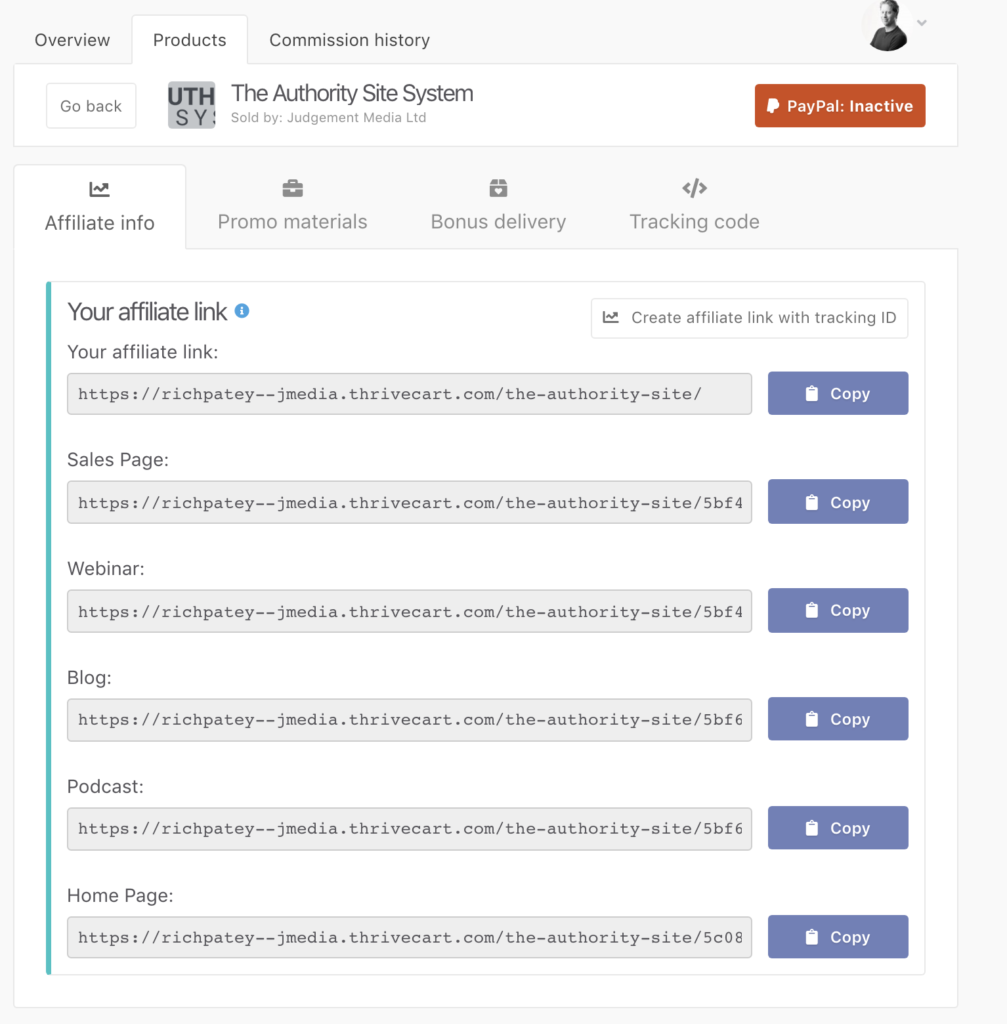
The really unique feature which we’ve not seen in any other affiliate tracking software is the ability to add your Facebook pixel or google analytics ID, or any custom code, to your links, to enable you to accurately track spend and conversion rates, as shown below:
A new feature is something called JV Partners.

This allows you to split any type of revenue with partners.
So you can setup a contract with your JV partners right in
Thrivecart Vs Samcart
Both SamCart and
Both platforms allow you to create professional checkout pages from pre-designed templates, add one-click upsells to boost average order value, and run affiliate programs.
Both solutions create custom sign-up pages for your affiliates, where the company can choose which products or services they would like their affiliates to promote, along with setting the affiliate commission for making a sale.
ThriveCart Support
In this
Especially, considering the fact that you don’t pay a monthly fee for their platform.
So you would probably want to know how they would help you out in case you have any tech issue or a question that needs to be answered.
At the same time, you also probably want to know what other resources they offer that can help you learn how to use the shopping cart platform to get sales for your business.
So let’s take a look at the support they provide:
Help desk –

In the search bar, you can type your question, and immediately you will have suggested content that might answer it.
Besides this, you also get access to 189 support articles organized in 26 categories.
So you get how-tos, step-by-step guides, and instructions on topics like:
- How to get started with
ThriveCart - Creating Products
- Creating Sales Funnels
- Billing & Payments
- Managing customers
- Integrations
- Physical products
- How to use the affiliate platform
- JV Contracts & Revenue Sharing
ThriveCart Pro- Custom Scripts & Codes
- Advanced Usage
- FAQs
- Quick tips
… and more.
Besides this, you also get access to
Facebook group –
It currently has 9,111 members so it’s not super big but it’s engaged.
This is a place where you can ask any question you want about
You can post if you want to hire someone to help you with something.
And you can simply use the Facebook group to connect with other users and exchange ideas.
Ticket support –
So you can fill out a form and the customer support is going to contact you within 24h with a solution to your problem.
The support is available Monday to Friday between 9 am to 6 pm NZST.
In other words, you don’t get support on the weekends and at night.
This could be a problem if you’re in the middle of a launch and you need a fast response.
Even though,
Email support –
You can contact them at support@thrivecart.com.
Their email support time is the same as the ticket supporting without a difference.
In fact, you have any suggestions for new features, you can contact
Later on, they will prioritize your request in the product development.
Phone support – Unfortunately,
But I don’t think most people can expect it when they’re not paying a monthly fee.
Still, their ticket support and email support can do a pretty good job.
So in this
Thrivecart Pricing
If you go to the website of
You can only enter your email to be notified when they go live.

In reality,
This means that you have no monthly fees so, in the long run, this can save you a lot of money.
And this is exactly why
They also give you the option to purchase an add-on for $195 that will allow you to white-label it.
Right now there is a little badge on the cart that says “powered by
You can also use your domain name with it.
So you can embed your shopping cart on yourdomain.com/cart.
You can also make carts for 5 different brands so if you have multiple websites or clients you can use it for them.
For that price, you get amazing features that allow you to create high-converting shopping carts for your products.
And you can have upsells, downsells, and order bumps to help you maximize your average order value.
No to mention you can also setup coupon codes and even create your own affiliate program.
So you can have affiliates promoting your products.
It’s a good deal especially compared to other hosted platforms that carry a heavy monthly fee.
For example: let’s look at
To get the same features that
This means that the first year alone, you will pay
Now let’s compare this to the
For comparison, you can get the shopping cart software for only one payment of $597 and this is a lifetime deal. After this, you never have to pay again.
The one thing that’s extra is the add-on which is another $195.
I don’t know if they will offer their shopping cart software as a one-time payment forever.
In the future, they might decide to setup a monthly pricing package around $97/month similar to Clickfunnels.
But for now, the one-time payment that is a lifetime deal is still available. So you should take advantage while you still can.
The only thing that’s missing is a free trial here.
But despite this,
So if within 30-days you’re not happy with your purchase, you can request a refund and
In Conclusion
All of their features have been created with the idea to help you sell more of your products and services.
So you can increase your average order value and maximize your profitability.
It’s a great option for anyone who’s selling digital products such as courses, access to online membership sites, etc.
But it could be used by people who sell physical products as well who want a better and higher converting shopping cart.
I’m a big fan of the 1-click bump offer as it’s so easy to place on your cart page and it brings in a lot more sales.
The upsells and downsell features are amazing as they add a lot of extra revenue.
And the best part is that
Even by people who’re extremely non-techy.
So if you’re looking for a shopping cart solution for your online business, you might want to give ThriveCart a try.
[lasso rel=”thrivecart-link” id=”2637″ ref=”thrivecart-link” link_id=”703″]